Larger, more rambley version

First up my talents that I used... I probably could have picked better, but these seemed to do fine. I used the Beast Mastery specialization.
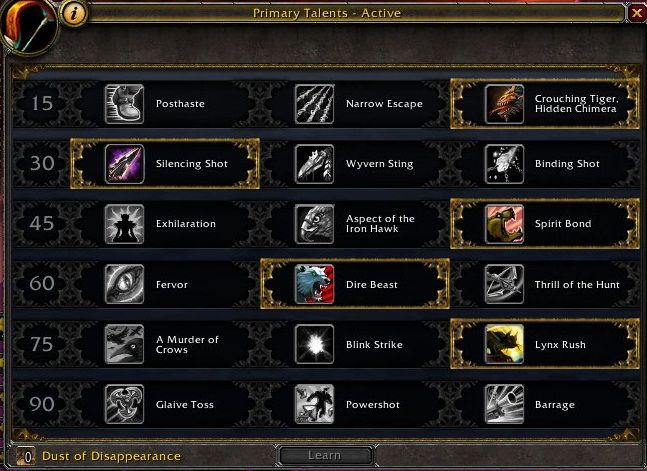
The major ones that I would like to point out would be the third tier (the heals and damage reductions.)
I found [Spirit Bond] to be amazing!! It certainly makes a big difference. With the regen now being 2% every 2 seconds as appose to 2% every 10 seconds it makes a great choice.
[Exhilaration] is very nice too, it makes for a great emergency heal (healing 30% of your health and 100% to your pet.) This can occur once every 2 minutes.
Even though [ Exhilaration] is great I still find [Spirit Bond] to be the best choice, if you work it out – within the time frame of those 2 minutes you actually will have 60% regen every minute...So 2x 60% xD. (A lot of it would be over healing though, but the constant ticking of it means you’re always regenerating health.
As BM, if you glyph Bestial Wrath, you pretty much have an invincible pet for 15 seconds; So I think that this makes up for the emergency button xD.
As for glyphs, mine were a bit dodgy since I didn’t have all of them available. I would have to say that the [Glyph of Endless Wrath] is a must have. While your pet can still take damage, it is unkillable while under the effects of Bestial Wrath.
I assume the other best choices would be [Glyph of Mending] – increasing the heals done by Mend Pet by 60%... and possibly [Glyph of Animal Bond] – increasing healing done to you and your pet by 10%. I may be wrong, but just by assumption xD.
The minor glyphs aren’t too important, you can go with whatever floats your boat really : P.
I suppose with Revive Pet only being a 5 second cast though, you could use the glyph of Revive Pet so that you do not suffer any pushback, in case of a mid combat pet death. That or you could just use Deterrence and Revive Pet if it works xD.
Any who, getting on with the fight... As mentioned earlier, a majority of this strategy was not created by me.
Of course you will want a tenacity specced pet for this (turtles and beetles still remain the best tanks due to their shell shield / harden carapace. Note- I always have these abilities as well as Cower or Spirit Mend so that I can use them manually for the best effects.
I also decided to bring 3 spirit beasts with me...a bit much haha! But it’s good to have at least one so that you have some extra heals for phase changes ( think of the transition between P4 and P5, plenty of free time to summon another pet or two to heal up if you’re damaged alot from bad RNG.) It’s great since Spirit Mend has an individual CD on each pet.
I equipped myself with a PVP trinket in case I really needed it, mainly for the 8 second disorients from the mage + Kael. Only use it if absolutely necessary, you don’t want it to be on CD when you’re disoriented and your pet is about to go smoosh!
To start with you want to make sure that you have cleared all the mobs from the beginning hallway, Al’ar’s room, and the mobs in the left hand side hallway leading to Kael’s room as well as all of the packs in his room. (I don’t think you would have to kill Al’ar, I don’t believe he would aggro... but I did kill him anyway xD.)
Also, since we don’t spend any time fighting within Kael’s room you would think you would not need to clear those mobs, though it’s good to do so anyway to be on the safe side; as I have experienced those packs joining the fight while on my Death Knight...But then they reset; a bit weird but entirely up to you xD.
 P1:
P1: Firstly once you’ve started the fight, you will need to immediately exit Kael’s room before the door locks. You’ve got plenty of time to run all the way to the entrance of the instance... Thaladred is a very slow walker and you will probably end up having to wait yonks for him haha! You will want to position yourself in such a way that when Thaladred arrives he won’t knock you backwards right out of the instance; having your back against a wall is fine.
Once he is dead all you need to do is wait some more for Lord Sanguiner to arrive (He will come faster since he runs at a faster pace.) Again you need to make sure you don’t get feared out of the instance haha.
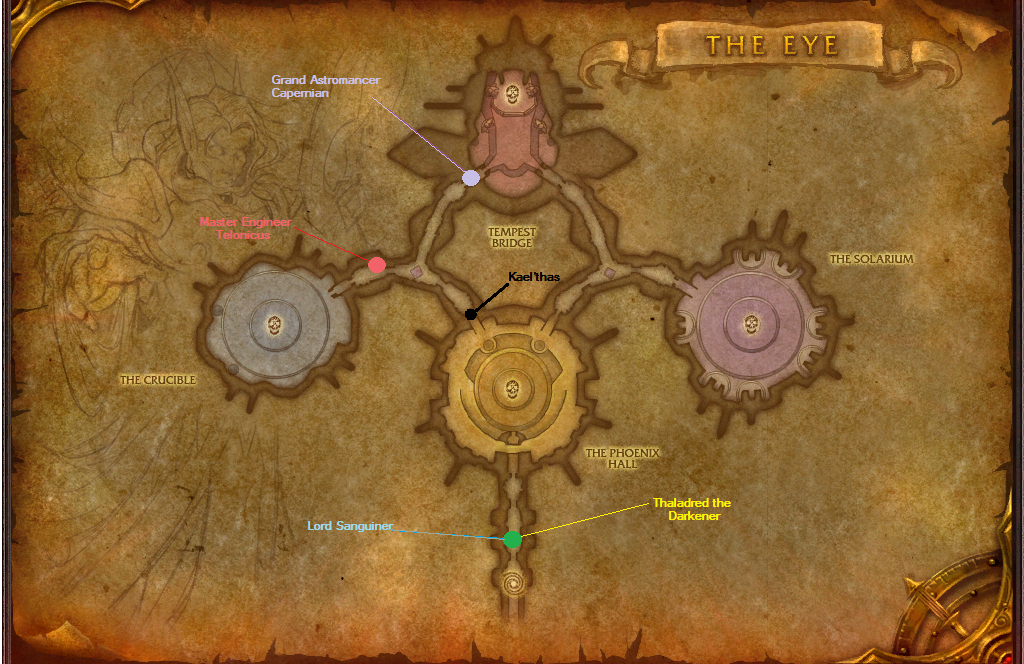
Right after Sanguiner is killed you need to start heading back toward Kael’s room to meet up with Grand Astromancer Capernian, Note- It’s good to use Aspect of the Cheetah here to speed things up a bit.
By the time you meet the mage you will probably be entering the hallway after Al’ar’s room; misdirect her to your pet (which should be on passive so that it follows you) and continue all the way up to the tiny hallway right before Kael’s room. Lean right against the locked doorway till the mage follows you into the hallway and kill her (Don’t worry if you get disoriented, it won’t kill you xD.)
Next you need to run to the red marker on my map and kill the engineer there. Either you or your pet will end up with the Remote Toy debuff but it isn’t too much of a worry.
P2:
Its weapon time now! Run back toward Kael’s room and when you meet with the weapons target the Cosmic Infuser and multishot to misdirect them all to your pet. Just kill them as fast as you can, once that’s done move to the Astromancer’s corpse and wait for her to be resurrected.
P3:
When the mage has been resurrected just smash her ASAP! The Engineer will arrive soon and you will need to kill him quite quickly too. Again you will probably have another Remote Toy debuff, but that’s okay. Next up Sanguiner will arrive, he should go down pretty easily. Finally Thaladred will reach you, work on him slowly while making your way toward the black marker on my map.
P4:
The moment Thaladred dies or when P3 ends Kael’thas will come for you ( You will want to avoid still having any advisor’s up when Kael comes though... not good!
You may wonder why I chose this placing in particular to kill Kael- I chose this spot due to the low roofing (Sometimes when he casts Gravity Lapse he likes to leave you to plummet to your death; but if the roof is low you cannot get thrown very high, thus avoiding a heck of a lot of fall damage

. There is a hallway rightoutside his room also has this low roof; I experimented fighting here... but he actually ended up teleporting me back into that room when he used Gravity Lapse... and so I ended up separated from my pet. This was no good, so I like to take the safe side and fight further down. Not only that, but it gives me a little more breathing space and preparation time between the transitions from P3- P4 and P4- P5.
Any who, Kael’thas will head your way, you want to position your pet something like this while you hide around the corner out of sight of Kael... (Yes this screenshot is from the closer hall way, but you get the idea: P
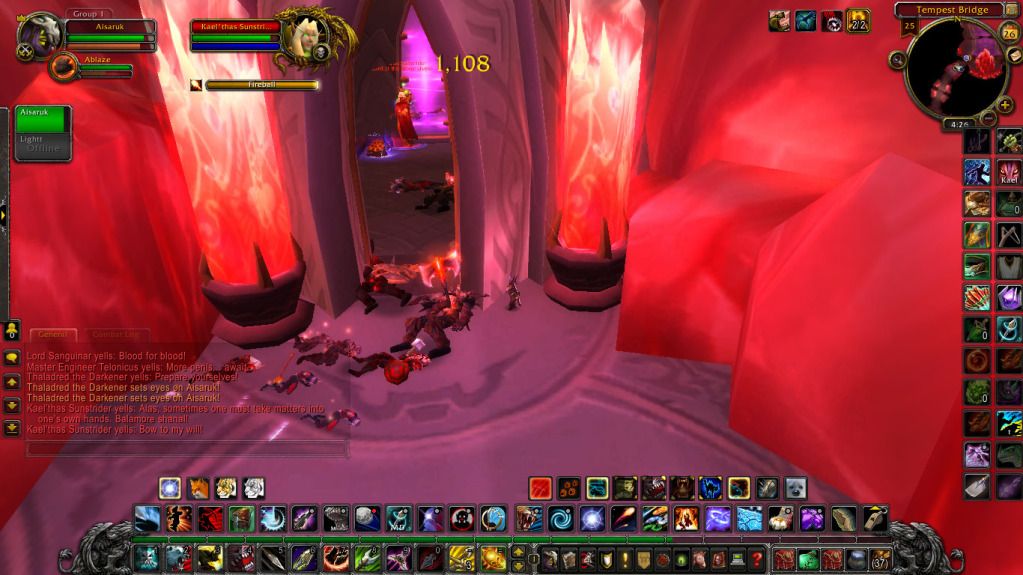
Thing is, with no staff you will often get disoriented for 8 seconds, but as long as you aren’t in sight of Kael and he doesn’t aggro onto you, you should survive fine. Sometimes he will randomly run to you though, so it’s good to have your finger over the Feign Death button just in case he does. If you see him coming you’ll have to press it damn fast to avoid any accidental mind controls!
Basically what you do here is just stay out of line of sight of him while using your pets Kill Command and Lynx Rush on cooldown, this allows at least some damage to continue while you’re standing there waiting. You can either ignore the phoenixes or kill them, they don’t do much damage at all.
When he yells ‘Obey me’ or ‘Bow to my Will’ this means he has casted mind control and that it is safe for you to come out from the wall and DPS him for around 20 seconds ( I believe it’s 30 seconds all up, but I try to avoid staying out too long just in case.) Rinse and repeat this until Kael is at 50% health; it shouldn’t take you long if your pet is attacking and using Kill Command.
P5:
upon reaching 50% Kael’thas will run back to his room to start his little RP floaty air thing =P, so you have a lot of time to kill any remaining pheonixes. If you need any heals you can always pop out a spirit beast and heal up, but if not then [Spirit Bond] will take care of it. Once he has finished Kael will head back toward you... but when he reaches roughly the area you killed the Astromancer he will cast Gravity Lapse. This will teleport you to his location but just swim away ASAP and make sure your pet is on passive and on follow to avoid nasty Nether Vapours!! Keep going until you’re back to your previous location. No more mind controls here so you can DPS him freely (you will still be disoriented though – remember to use your PVP trinket wisely!)
You will probably have a second gravity lapse, but you know what to do. Just swim away once again with your pet being switched back to passive and follow. Rinse and repeat and you should have a dead boss!
I did actually think of another thing that could be done, for P4 you could actually equip and use the Staff of Disintegration. This would mean no disorients, but the phase may go for a tad longer; you could just hide behind the wall most of the time and let your pet eat away at the boss, popping out to heal him during safe times ( only after you know a MC has just been casted. ) While you’re behind the wall and your pet looks in danger, remember you’ve got 3 CD’s, Shell Shield / Harden Carapace, Cower and the invincible pet button Bestial Wrath! Also Readiness is handy too if you need a second emergency Wrath.