Soloing Kael'thas in 5.0.4
Posted: Mon Aug 27, 2012 9:39 am
I noticed a post a while back concerning the effects on a hunter’s ability to solo Kael’thas once we lose the ability to wield both a ranged weapon and a staff (meaning we wouldn’t be able to have that immunity to all the horrible effects buff; that kind of sucks xD.) So I spent some time a couple nights ago on the PTR to see if I could work around this problem. ( I figure in MoP we’ll have it easy at level 90 with the higher stats) though being a crazed mount collector I couldn’t possibly miss 4 weeks of farming the Al’ar mount haha! I decided to use a strategy which is used by many other classes (so I can’t really take credit for this idea!) It is the very same strategy I use on my Death Knight to farm Ashes each week- 2 chances a week are better than 1  .
.
It is the one where you use a majority of the instance to kite the 4 advisers around to kill them, so that when they are resurrected all at once you are able to face them one by one and not be bombed by stuns and disorients.
I actually wrote 2 separate guides (the first being a shorter version, while the 2nd is more detailed.)... I actually wrote the larger one first, but I realized it was massive so I summarized it a bit into points xD.
Summarized version!
Need:
-Tenacity specced Turtle or Beetle pet with defensive CD’s turned off auto, for you to use manually when needed.
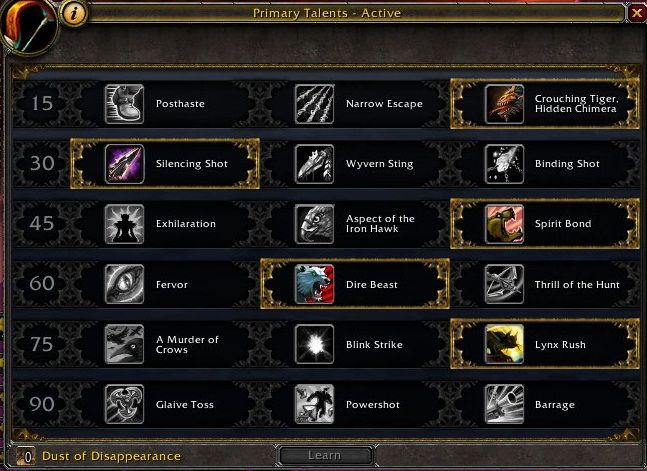
-Beast mastery specialization with [Spirit Bond] and [Lynx Rush] - the rest may be chosen as preferred.
-Glyph of Endless Wrath and [Glyph of Mending] – invincible pet for 15 seconds and 60% increased healing, yes please!
-PvP trinket.
Optional:
-Spirit Beast/s with you for extra heals.
Clear all the mobs from the beginning hallway, Al’ar’s room, and the mobs in the left hand side hallway leading to Kael’s room as well as all of the packs in his room.
P1:
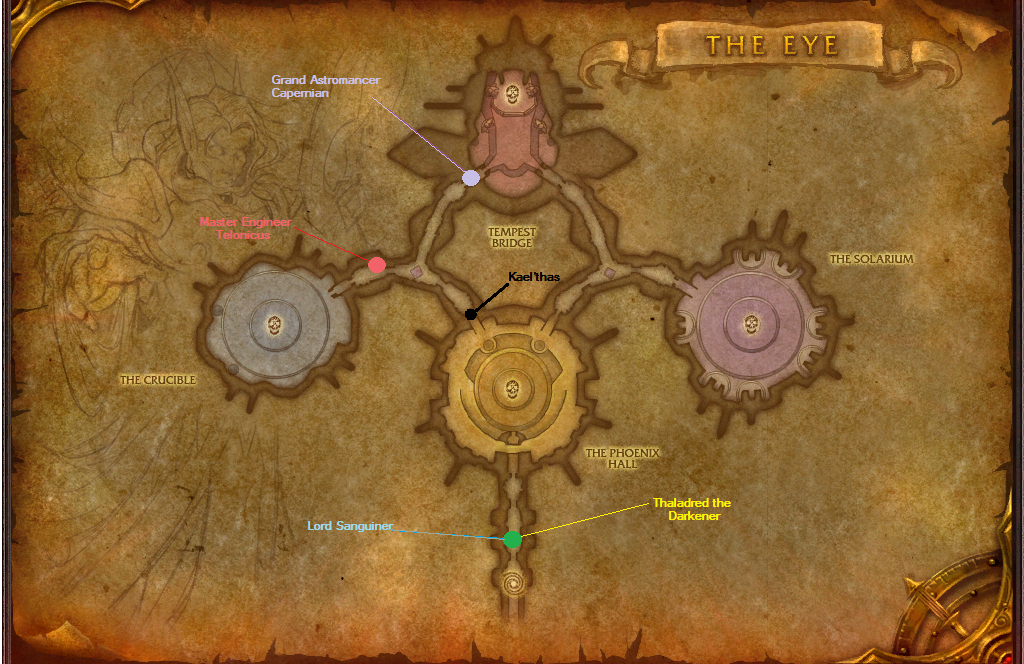
-Activate the fight and immediately exit the room before the door locks. Run to the green marker location on the given map.
- Wait for Thaladred and Sanguiner to come to you, and kill them here (be weary of the knock back and fear, don’t end up going through the exit.)
-Head toward Kael’s room and meet the Astromancer about halfway, misdirect her to your pet (which should be on passive and follow.) Ignore her and run all the way up to the violet marker and kill her there.
-Run to the red marker and wait for the Engineer, kill him here (don’t worry about the remote Toy debuff.)
P2:
- Head from the red marker to the violet, meeting up with the weapons half way. Misdirect these to your pet and kill them all ASAP.
-Move to the violet marker (the Astromancer’s corpse) and wait for the advisors to be resurrected.
P3:
-Kill the Astromancer as quickly as possible, using your PvP trinket to get out of the first disorient.
-the rest of the advisors will come to you; next you will face the Engineer; who needs to die fast.
- Kill Sanguiner when he reaches you.
- Slowly kill Thaladred while making your way toward the black marker.
P4:
-Kael’thas will make his way to you, position yourself and pet like this.
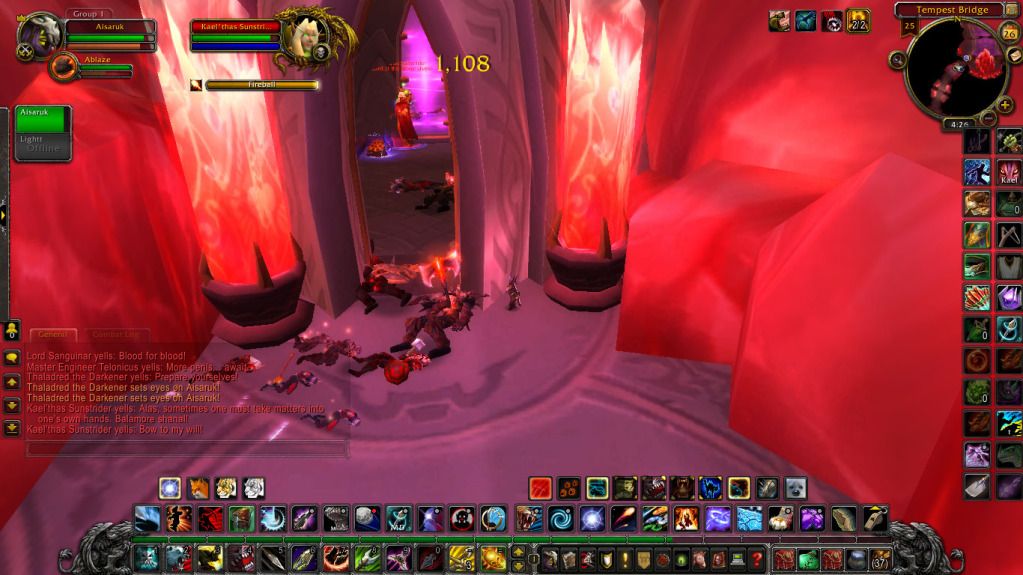
- Stay out of line of sight of Kael while your pet is melees him and uses Kill Command and Lynx Rush on CD.
-You can either ignore or kill the phoenixes, I would ignore them however, as they don’t hurt much.
- When you have seen Kael yell ‘Obey me’ or ‘Bow to my will’ you can safely come out and DPS him as well as heal your pet for roughly 15-20 seconds, don’t push it too long. Before you LoS again, have a fresh MD go to your pet.
-If your pet is in danger but are still waiting for a MC cast, don’t risk running out to heal; make use of your pets defensive CD’s such as Shell Shield/ Harden Carapace, Cower and most importantly your glyphed Bestial Wrath which will make your pet unkillable for 15 seconds.
-This phase will end when his health reaches 50%.
P5:
- Kael will run back to his room, just wait around for his RP to finish (Heal up with a Spirit Beast heal if you need, or let [Spirit Bond] do the job.
-You will be teleported to the violet marker when Kael casts Gravity Lapse which throws you in the air allowing you to swim through it.
-Make sure your pet is on passive and follow while you swim all the way back to the black marker.
-Wait for Kael to reach you and then begin to fight him as normal (no more LoSing needed.)
-Try to keep his aggro on your pet because he can hurt a lot with his fireballs (you can interrupt some of these if you have [Silence Shot.]
-Ignore the phoenixes again and just DPS Kael until the 2nd Gravity Lapse occurs. When it does just put your pet on passive and follow again while you swim away from him to avoid Nether Vapours.
-Rinse and repeat until dead!
Dead boss!
It is the one where you use a majority of the instance to kite the 4 advisers around to kill them, so that when they are resurrected all at once you are able to face them one by one and not be bombed by stuns and disorients.
I actually wrote 2 separate guides (the first being a shorter version, while the 2nd is more detailed.)... I actually wrote the larger one first, but I realized it was massive so I summarized it a bit into points xD.
Summarized version!
Need:
-Tenacity specced Turtle or Beetle pet with defensive CD’s turned off auto, for you to use manually when needed.
-Beast mastery specialization with [Spirit Bond] and [Lynx Rush] - the rest may be chosen as preferred.
-Glyph of Endless Wrath and [Glyph of Mending] – invincible pet for 15 seconds and 60% increased healing, yes please!
-PvP trinket.
Optional:
-Spirit Beast/s with you for extra heals.
Clear all the mobs from the beginning hallway, Al’ar’s room, and the mobs in the left hand side hallway leading to Kael’s room as well as all of the packs in his room.
P1:
-Activate the fight and immediately exit the room before the door locks. Run to the green marker location on the given map.
- Wait for Thaladred and Sanguiner to come to you, and kill them here (be weary of the knock back and fear, don’t end up going through the exit.)
-Head toward Kael’s room and meet the Astromancer about halfway, misdirect her to your pet (which should be on passive and follow.) Ignore her and run all the way up to the violet marker and kill her there.
-Run to the red marker and wait for the Engineer, kill him here (don’t worry about the remote Toy debuff.)
P2:
- Head from the red marker to the violet, meeting up with the weapons half way. Misdirect these to your pet and kill them all ASAP.
-Move to the violet marker (the Astromancer’s corpse) and wait for the advisors to be resurrected.
P3:
-Kill the Astromancer as quickly as possible, using your PvP trinket to get out of the first disorient.
-the rest of the advisors will come to you; next you will face the Engineer; who needs to die fast.
- Kill Sanguiner when he reaches you.
- Slowly kill Thaladred while making your way toward the black marker.
P4:
-Kael’thas will make his way to you, position yourself and pet like this.
- Stay out of line of sight of Kael while your pet is melees him and uses Kill Command and Lynx Rush on CD.
-You can either ignore or kill the phoenixes, I would ignore them however, as they don’t hurt much.
- When you have seen Kael yell ‘Obey me’ or ‘Bow to my will’ you can safely come out and DPS him as well as heal your pet for roughly 15-20 seconds, don’t push it too long. Before you LoS again, have a fresh MD go to your pet.
-If your pet is in danger but are still waiting for a MC cast, don’t risk running out to heal; make use of your pets defensive CD’s such as Shell Shield/ Harden Carapace, Cower and most importantly your glyphed Bestial Wrath which will make your pet unkillable for 15 seconds.
-This phase will end when his health reaches 50%.
P5:
- Kael will run back to his room, just wait around for his RP to finish (Heal up with a Spirit Beast heal if you need, or let [Spirit Bond] do the job.
-You will be teleported to the violet marker when Kael casts Gravity Lapse which throws you in the air allowing you to swim through it.
-Make sure your pet is on passive and follow while you swim all the way back to the black marker.
-Wait for Kael to reach you and then begin to fight him as normal (no more LoSing needed.)
-Try to keep his aggro on your pet because he can hurt a lot with his fireballs (you can interrupt some of these if you have [Silence Shot.]
-Ignore the phoenixes again and just DPS Kael until the 2nd Gravity Lapse occurs. When it does just put your pet on passive and follow again while you swim away from him to avoid Nether Vapours.
-Rinse and repeat until dead!
Dead boss!