
0. Introduction
(Basic Info, Spec, Pet Choices)
1. Sethekk Halls
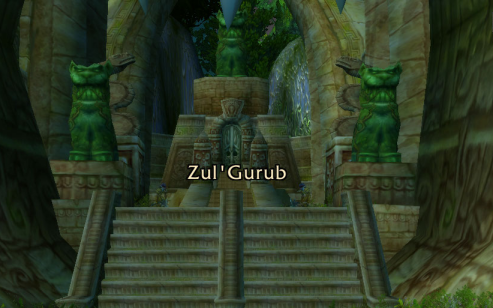
2. Zul'Gurub
3. Stratholme
4. Karazhan
5. Magister's Terrace
Hello, and welcome to Acherontia's Solo Mount-Running Guide for Hunters. In this guide, I'm going to cover the basics of soloing old WoW content as a hunter, and offer brief guides on how to run the mount-dropping bosses in Sethekk Halls, Zul'Gurub, Karazhan, Stratholme and Magister's Terrace quickly and efficiently. The maps are -not- mine, but the screenshots and text are. Note this is how I've always done these, and it works for me; you may know of a better way, or one that works better with your style. If you don't, though, you can use this guide as a starting point!
Questions, comments and suggestions are welcome!
Basic Info:
If you're wanting to solo old content, here's what you'll want:
* A decent pet (see the Pet Choice section for more)
* Food and bandages
* Glyph of Feign Death
* Glyph of Misdirection
You can probably do without one or all of these things, but they'll make your life a lot easier. A good pet can hold aggro on multiple mobs--it isn't so much the tanking ability of the pet that's important so much as the talent Thunderstomp, so make sure your tenacity pet has it. Again, you could make do without--Misdirection and AoE works--but it makes it easier. Food and bandages minimize your downtime if you do take a few nasty hits, and Feign Death allows you to skip trash you might otherwise need to clear (or accidentally pull and would rather dump). The glyph allows you do do this more often. The Glyph of Misdirection allows you to MD constantly onto your pet. Also of use might be Lesser Invisibility Potions. These let you skip entire sections of dungeons you'd rather avoid.
A focus macro (such as the following), with your pet set on Focus, will allow you to quickly and easily transfer some threat to your tanking pet. Use this, keeping in mind to watch Mend Pet and your aggro (the Omen threat meter addon is a huge help here), and you should have few problems soloing.
#showtooltip Misdirection
/cast [target=focus,help] Misdirection
Deterrance can be used in a couple creative ways. First of all, if your pet is getting low on health, you can use a Distracting Shot followed by Deterrance (be sure to use the shot first, as you cannot shoot during Deterrance) to tank the mob while Mend Pet ticks heal the pet up a bit. Feign Death once Deterrance has run out. Another way to use Deterrance is if you get into trouble: Deterrance + Dismiss Pet, and then Feign Death, can keep both you and the pet from dying.
For Spirit Beast soloing, a macro like
#showtooltip Spirit Mend
/cast [target=[player,help] Spirit Mend
can easily heal any extra damage on you while your Mend Pet ticks on the pet.
One final note: when moving about through a dungeon, it's generally best to Dismiss your pet until you are ready to fight. The reason for this is that if you get aggro, you can easily Feign Death somewhere safe without worrying about your pet aggroing, dying and perhaps getting you killed in the process. Simply stealthing a pet who can Prowl rarely works; mobs seem to see them anyway, and some buffs castable while stealthed will aggro the pet unless you manually enable and disable them; it's easier just to dismiss and recall.
Spec, etc:
A Beast Mastery spec is generally the easiest way to solo; it allows your pet to do more damage, thus keeping aggro on the mobs, and allows it to take more punishment from the tougher bosses without dying. PvP gear that boasts high Stamina can be helpful in keeping you and your pet alive. For talents, Hunter vs Wild (in Survival; easily obtainable by BM or MM hunters) and Spirit Bond (BM) will help the hunter and pet stay alive longer. For Ferocity pets, Bloodthirsty, Heart of the Phoenix and Lick Your Wounds will help the pet stay in the game longer, and for Tenacity pets, Blood of the Rhino, Last Stand, Guard Dog and Silverback, along with the Avoidance and Stamina talents, will help it rival even a player tank in survivability. Cunning pets boast similar stamina and avoidance talents, albeit less of them, and can also take Cornered for less damage taken at low health. In the end, though, Hunters are strong enough that any spec and any pet, in any gear, when played correctly, can probably solo--well, duo--just about anything that can be soloed. These are simply guidelines for an easier time.
Pet Choices:
There are many pets a player can solo with; in fact, any pet can probably do most of the content required for rare mount runs. However, a few can do it better than others, and for players new to soloing, hesitant about their skill or gear, or simply wanting to play it safe, some pets are a better choice. I will touch on the top choices for Ferocity and Tenacity; there's far too many pet families to go through them all and rate them in a simple soloing guide.
For Ferocity Pets, Spirit Beasts are the obvious choice right now. Their heal is quite strong, and can be used on the player as well as the pet--so for fights with unavoidable AoE or dots placed on non-tank players, the Spirit Beast really shines. Carrion Birds have an AoE attack power reduction similar to a bear or druid tank's Demoralizing Roar/Shout. The benefit of using a Ferocity pet is that fights go faster, and a Ferocity pet can do quite a high amount of damage and threat.
In the Tenacity department, Turtles are top-notch. They have an ability to reduce their incoming damage taken, which for fighting a hard-hitting or enraging boss can be a lifesaver. Bears are excellent as well, for the same reason as carrion birds: their AoE attack power reduction can be helpful. Worms have an excellent, extremely high-dps AoE ability to help them keep aggro on--and quickly clear--large groups. A Tenacity pet will be extremely hard to kill, although its damage might be a bit lower than a dps-specced Ferocity pet.
In the end, the pet must fit your playstyle and your preferences. I have personally tanked all of the bosses in question with both Ferocity and Tenacity pets, so it is definitely doable. Try them out and see what works for you!
Acherontia's Solo Mount-Running Guide for Hunters
Forum rules
Be respectful of others or else. Read the details.
Be respectful of others or else. Read the details.
-
Acherontia

- Community Resource

- Posts: 3072
- Joined: Mon Jan 25, 2010 12:27 pm
- Realm: Argent Dawn EU
- Gender: Female
Acherontia's Solo Mount-Running Guide for Hunters
Last edited by Acherontia on Sat Oct 30, 2010 5:20 am, edited 7 times in total.
-
Acherontia
- Community Resource
- Posts: 3072
- Joined: Mon Jan 25, 2010 12:27 pm
- Realm: Argent Dawn EU
- Gender: Female
Re: Acherontia's Solo Mount-Running Guide for Hunters
Part 1: Sethekk Halls
Reins of the Raven Lord
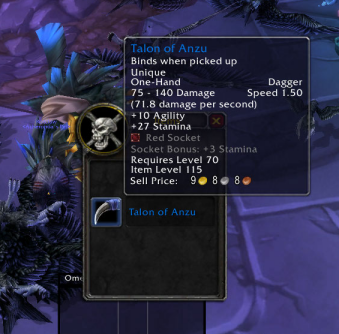
You may be wanting to solo Sethekk Halls for the Reins of the Raven Lord mount. Recently this mount became available to all players; in the past, you needed a druid who'd completed his or her Swift Flight Form quest chain to summon this boss.
Instance Notes: This dungeon needs to be run on Heroic, or the boss will not be present. You must therefore possess the Auchenai Key, purchased at Honored or above reputation with Lower City. On the same note, ALWAYS be sure that the dungeon difficulty is set to 5 Man HEROIC before you enter. You'll see the skull on the portal if it is--if you forget, you may find yourself having cleared to Anzu's empty room! If you realize halfway through that the mobs aren't level 70 and above, and your character isn't drunk, double-check to be certain it's on Heroic. The instance is located in Auchindoun (Terokkar Forest), in an alcove on the eastern side of the complex.
I'm going to give this from the perspective of a speed run, but if you aren't comfortable with the dungeon or a rushing pace, or want rep with Lower City, you're perfectly able to simply clear the trash as you go. In that case, ignore all of the Feigns listed here and simply kill.
Mob Notes: Ravenguards (groups of 2 guarding door entryways) can hit extremely hard. Be sure to leave Mend Pet on your pet and not pull aggro on these. Time-Lost Controllers, if aggrod, can create mind-control totems that will force you to kill your pet; feigning death and then standing while they are still up can re-aggro you to the pack, even if you are a good distance away. Therefore, avoid these packs, or focus the Controllers first (nuking totems as they come, as priority), or if you feign, be sure to wait until all totems are dead before standing again. If you run into any Time-Lost Prophets, be aware that they fear (this is an effect that can be broken with BW/trinkets, and the cast can be interrupted).
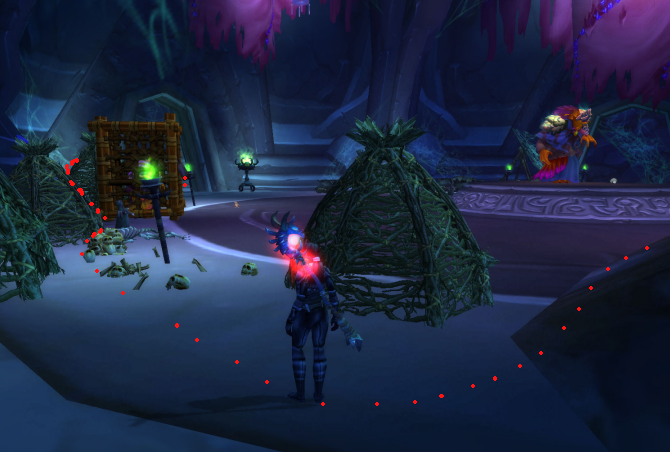
1. First Room. Dismiss your pet. Put on Aspect of the Pack. Triple-check for Heroic difficulty, and walk into the instance. Run in and stick to the right side of the wall, move behind the baskets and wait for the two guard mobs to get into place. As soon as the patrol passes (it comes up one side of the hall and goes back down the other), continue to the end of the hall. Change to Aspect of the Hawk, put on Deterrance and run through this room to the left; spinning and Disengaging into the next hall makes it faster and safer. Feign Death here, just beyond the aggro range of the pair of guards. If you're afraid of taking damage, you can simply clear the packs with your tank pet.
First patrol's path:
3. Third Room: First Boss Room. Run past the two guards, press yourself against the left side of the room or just past their aggro range, and feign.
5. Stairs and Hall. Avoid or kill the wind serpent on the stairs--it patrols from the very top to the very bottom. There'll be another pack of Ravenguards at the entrance to the next hall; run through and feign beyond them. Here, you'll find another pack of tiny birds in front of you. Pull out your pet again, Misdirect onto it and give it a preemptive Mend Pet; shoot an Explosive Trap into the midst of the birds and begin Multishotting. You might get a bit of aggro but don't worry about it; alternatively you can just stop multi-shotting and let the pet kill them, assisting on it to avoid pulling the lot onto yourself.
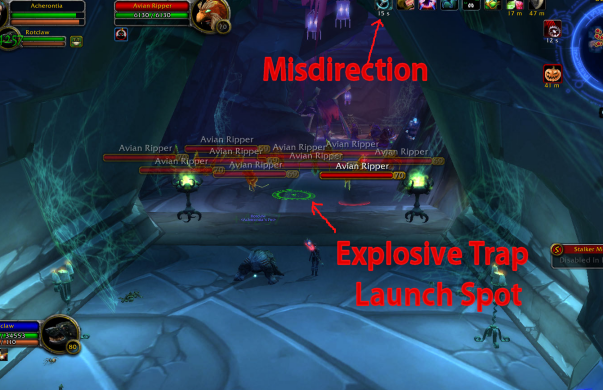
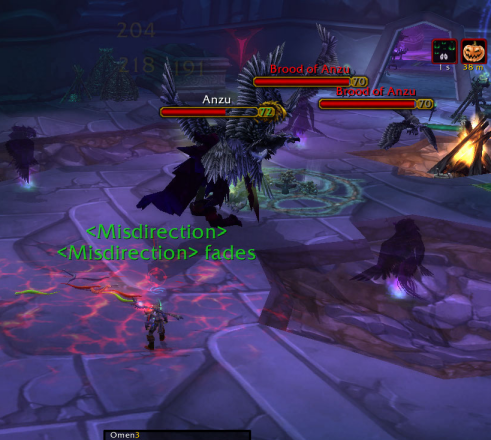
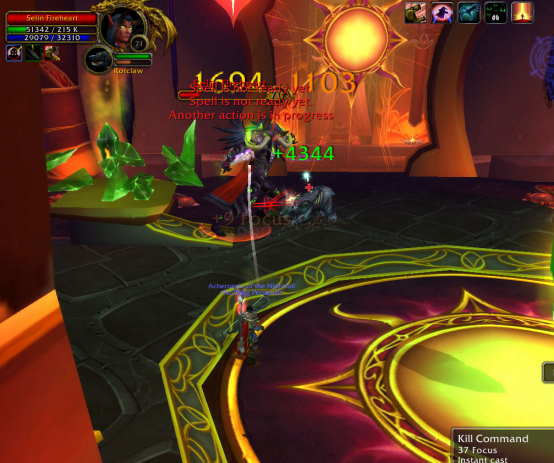
8. Anzu himself: Do NOT misdirect at the start (unless you have it glyphed); instead, save it for his first Phase 2 shift. Send pet, and use Bestial Wrath if you have it, and Kill Command; otherwise, give the pet some time to build up a good amount of threat. If you outaggro your pet feign the aggro off, but try to save feign for the second phase. Eventually Anzu will go immune (banished), and you and the pet will probably be stunned for about 6 seconds. A flock of small birds will descend and attack; now is the time to Misdirect (being sure autoattack is off Anzu) and place an Explosive and Snake trap below you. Pop another Mend Pet and either Multishot spam or feign and wait for some birds to die. If you find that you're pulling a lot of aggro, simply assist the pet's target (F key by default). Save your MDs and Feigns for the banish/bird adds phase, which repeats. In the end, I find the Sethekk Heroic trash far more challenging at times than Anzu himself. Once you reach him, it's a fairly easy fight.
Best of luck on your Raven Lord mount!
Reins of the Raven Lord
You may be wanting to solo Sethekk Halls for the Reins of the Raven Lord mount. Recently this mount became available to all players; in the past, you needed a druid who'd completed his or her Swift Flight Form quest chain to summon this boss.
Instance Notes: This dungeon needs to be run on Heroic, or the boss will not be present. You must therefore possess the Auchenai Key, purchased at Honored or above reputation with Lower City. On the same note, ALWAYS be sure that the dungeon difficulty is set to 5 Man HEROIC before you enter. You'll see the skull on the portal if it is--if you forget, you may find yourself having cleared to Anzu's empty room! If you realize halfway through that the mobs aren't level 70 and above, and your character isn't drunk, double-check to be certain it's on Heroic. The instance is located in Auchindoun (Terokkar Forest), in an alcove on the eastern side of the complex.
I'm going to give this from the perspective of a speed run, but if you aren't comfortable with the dungeon or a rushing pace, or want rep with Lower City, you're perfectly able to simply clear the trash as you go. In that case, ignore all of the Feigns listed here and simply kill.
Mob Notes: Ravenguards (groups of 2 guarding door entryways) can hit extremely hard. Be sure to leave Mend Pet on your pet and not pull aggro on these. Time-Lost Controllers, if aggrod, can create mind-control totems that will force you to kill your pet; feigning death and then standing while they are still up can re-aggro you to the pack, even if you are a good distance away. Therefore, avoid these packs, or focus the Controllers first (nuking totems as they come, as priority), or if you feign, be sure to wait until all totems are dead before standing again. If you run into any Time-Lost Prophets, be aware that they fear (this is an effect that can be broken with BW/trinkets, and the cast can be interrupted).
1. First Room. Dismiss your pet. Put on Aspect of the Pack. Triple-check for Heroic difficulty, and walk into the instance. Run in and stick to the right side of the wall, move behind the baskets and wait for the two guard mobs to get into place. As soon as the patrol passes (it comes up one side of the hall and goes back down the other), continue to the end of the hall. Change to Aspect of the Hawk, put on Deterrance and run through this room to the left; spinning and Disengaging into the next hall makes it faster and safer. Feign Death here, just beyond the aggro range of the pair of guards. If you're afraid of taking damage, you can simply clear the packs with your tank pet.
First patrol's path:
3. Third Room: First Boss Room. Run past the two guards, press yourself against the left side of the room or just past their aggro range, and feign.
5. Stairs and Hall. Avoid or kill the wind serpent on the stairs--it patrols from the very top to the very bottom. There'll be another pack of Ravenguards at the entrance to the next hall; run through and feign beyond them. Here, you'll find another pack of tiny birds in front of you. Pull out your pet again, Misdirect onto it and give it a preemptive Mend Pet; shoot an Explosive Trap into the midst of the birds and begin Multishotting. You might get a bit of aggro but don't worry about it; alternatively you can just stop multi-shotting and let the pet kill them, assisting on it to avoid pulling the lot onto yourself.

8. Anzu himself: Do NOT misdirect at the start (unless you have it glyphed); instead, save it for his first Phase 2 shift. Send pet, and use Bestial Wrath if you have it, and Kill Command; otherwise, give the pet some time to build up a good amount of threat. If you outaggro your pet feign the aggro off, but try to save feign for the second phase. Eventually Anzu will go immune (banished), and you and the pet will probably be stunned for about 6 seconds. A flock of small birds will descend and attack; now is the time to Misdirect (being sure autoattack is off Anzu) and place an Explosive and Snake trap below you. Pop another Mend Pet and either Multishot spam or feign and wait for some birds to die. If you find that you're pulling a lot of aggro, simply assist the pet's target (F key by default). Save your MDs and Feigns for the banish/bird adds phase, which repeats. In the end, I find the Sethekk Heroic trash far more challenging at times than Anzu himself. Once you reach him, it's a fairly easy fight.
Best of luck on your Raven Lord mount!
Last edited by Acherontia on Sat Oct 30, 2010 5:28 am, edited 5 times in total.
-
Acherontia
- Community Resource
- Posts: 3072
- Joined: Mon Jan 25, 2010 12:27 pm
- Realm: Argent Dawn EU
- Gender: Female
Re: Acherontia's Solo Mount-Running Guide for Hunters
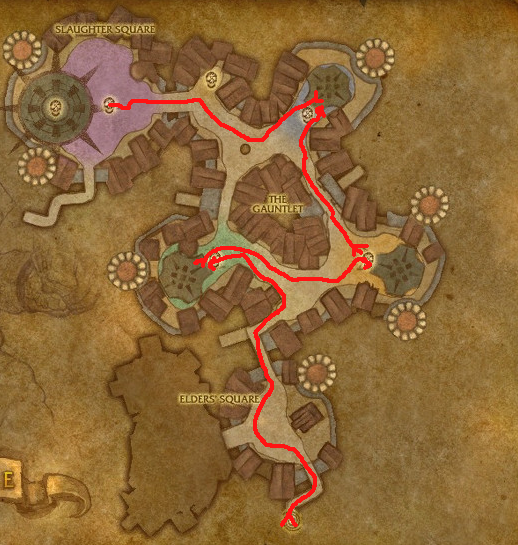
Part 2: Zul'Gurub
Zulian Tiger & Razzashi Raptor
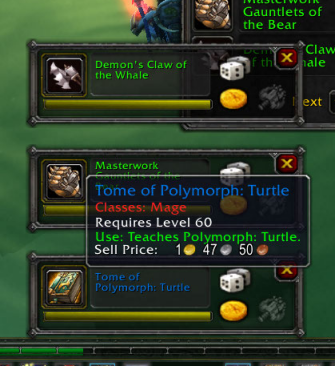
In this part, I will cover three bosses. The first is High Priest Thekal, who can drop the Reins of the Zulian Tiger. The second is Bloodlord Mandokir, a tough fight indeed, who can drop Reins of the Swift Razzashi Raptor. The third, if you have done the required quest chain, is the hydra in the lake, who can drop Tome of Polymorph: Turtle for a good sale on the Auction House.
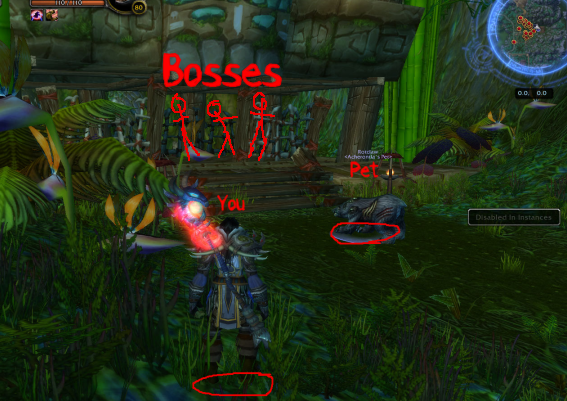
Instance Notes: This level 60 dungeon is actually a raid, and you are required to be in a raid group in order to enter; therefore, you'll need someone, preferably a trusted friend's alt, to form a raid group with you. Be wary of inviting randomers who offer, as they may sneak in and roll on the mounts without you noticing! The raid itself is located in the far northeastern portion of Stranglethorn Vale, reachable by running directly east from Lake Nazferiti. If you want to do a full clear of the raid, you are capable of doing so as a solo hunter; there are many mobs and bosses that I'm not covering in this guide, however, so you'll need to find a more comprehensive one. Using http://www.wowwiki.com to find the various boss tactics will help. By the way, if you happen to see Voodoo Piles lying about, be aware that looting them will a. aggro nearby mobs and b. often MC you, forcing you to kill your pet. So clear the area, and dismiss your pet, before doing this!
Mob Notes: If you accidentally aggro mobs, most of them are easily defeated. There are four, however, to take notice of. First, and most important, are the Axe-Throwers. These do a spinning attack which can stun you and the pet for several seconds. If you have three or more Axe-Throwers on you at once, this can spell disaster--so do not get cocky and pull full rooms! Next are the Blood-Drinkers. These mobs will damage mobs around them, healing themselves for 5x the amount drained. It's best to simply kill any other mobs with them first so that they aren't healing themselves to full. Third are the Champions, which have a nasty knockback; these can throw you--repeatedly--into far-off packs of mobs if you aren't careful. Keep your back to a wall for these. Fourth, and last, are the Tiger Cubs. These are no threat by themselves and are easily killable, but tend to run off at low health and deliberately (they emote this) draw much larger packs of stronger mobs to you. Please note that the "important" mobs I'm listing are restricted to the area I'll be covering for the three bosses in question. (Also of note are the big Berserkers; they do hit hard and have an AoE fear, threat wipe and knockback, but are fairly easy to take down). Oh, and if you're after a Razzashi Hatchling, the red raptors in here do rarely drop it.
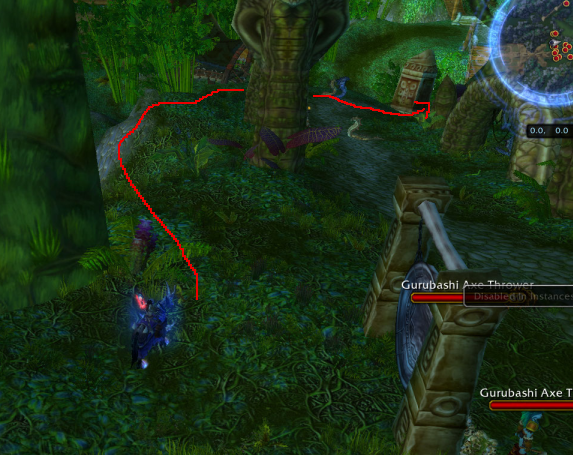
1. The Entrance: I run in, dismiss pet, and then mount up. You can run along the left-hand side of the grass here, right along the water's edge, and make your way straight across the first bridge, and then the second.
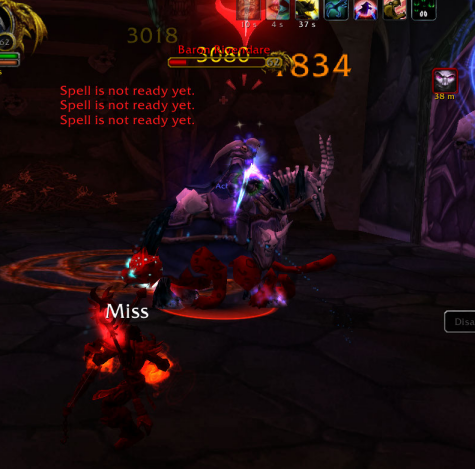
2. Mandokir's Room: Bloodlord Mandokir is a hard solo fight with several quirks. You may wish to clear his room (carefully, pack by pack and with your back to the wall for humanoid groups) if you're unfamiliar with the fight or wish to play it safe. The Bloodlord has a nasty fear, among other things, that can easily send you careening into multiple mob packs if you aren't careful on positioning, or are unlucky. If you go the route of clearing the room, also kill the Gurubashi Berserker that periodically patrols in, and through, the area. It walks nearly to the bottom of Mandokir's ramp and can quickly complicate a bad situation.
3. Mandokir: See the ramp, with the Vilebranch Speaker at the bottom? Once you kill him, the Bloodlord aggroes.
The boss will periodically cast Fear, wipe his threat, and often Whirlwind. These things are all dangerous; use PvP trinket or BW to break the fears if it looks like you may hit mobs, or run into his WW at low health. When he wipes threat, Feign Death or MD the pet again. Stay away from melee range or his WW will hurt! His raptor will also attack--this isn't tameable, so don't spend time Beast Loring it.
4. Surviving Mandokir: If you need to bandage, wait until his charge, and if possible his fear, have just been used, to reduce the likelihood of either interrupting your bandage cast. Make sure Mend Pet is always ticking. If you're going to die, go feign death in a corner somewhere; sometimes your pet will solo him, other times it will die and you can revive pet. Sometimes, even with the best preparation, you'll get unlucky as far as charge, WW, fear and threat dump, and you will die. This doesn't mean it's impossible by any means; you just got unlucky, it happens. Sometimes you will finish at full hp; sometimes you will die. Due to this RNG, I consider Mandokir one of the harder bosses to solo. You CAN avoid some of the stuns by not taking -any- action during the frequent debuff "Threatening Gaze," but he seems to charge anyway sometimes, and you'll have the debuff more often than not anyway. I prefer to simply nuke through it, but if you are having trouble, try holding off during the debuff.
Be aware that you cannot eat while in his room once he's been aggroed once; for some reason you are forced to stand every few seconds, interrupting food consumption. Do NOT waste buff food in this way!
In Summary: Stay near the top of the stairs, keep LoS on your pet & Mend ticking, stay out of melee range, and nuke as much as possible.
Zulian Tiger & Razzashi Raptor
In this part, I will cover three bosses. The first is High Priest Thekal, who can drop the Reins of the Zulian Tiger. The second is Bloodlord Mandokir, a tough fight indeed, who can drop Reins of the Swift Razzashi Raptor. The third, if you have done the required quest chain, is the hydra in the lake, who can drop Tome of Polymorph: Turtle for a good sale on the Auction House.
Instance Notes: This level 60 dungeon is actually a raid, and you are required to be in a raid group in order to enter; therefore, you'll need someone, preferably a trusted friend's alt, to form a raid group with you. Be wary of inviting randomers who offer, as they may sneak in and roll on the mounts without you noticing! The raid itself is located in the far northeastern portion of Stranglethorn Vale, reachable by running directly east from Lake Nazferiti. If you want to do a full clear of the raid, you are capable of doing so as a solo hunter; there are many mobs and bosses that I'm not covering in this guide, however, so you'll need to find a more comprehensive one. Using http://www.wowwiki.com to find the various boss tactics will help. By the way, if you happen to see Voodoo Piles lying about, be aware that looting them will a. aggro nearby mobs and b. often MC you, forcing you to kill your pet. So clear the area, and dismiss your pet, before doing this!
Mob Notes: If you accidentally aggro mobs, most of them are easily defeated. There are four, however, to take notice of. First, and most important, are the Axe-Throwers. These do a spinning attack which can stun you and the pet for several seconds. If you have three or more Axe-Throwers on you at once, this can spell disaster--so do not get cocky and pull full rooms! Next are the Blood-Drinkers. These mobs will damage mobs around them, healing themselves for 5x the amount drained. It's best to simply kill any other mobs with them first so that they aren't healing themselves to full. Third are the Champions, which have a nasty knockback; these can throw you--repeatedly--into far-off packs of mobs if you aren't careful. Keep your back to a wall for these. Fourth, and last, are the Tiger Cubs. These are no threat by themselves and are easily killable, but tend to run off at low health and deliberately (they emote this) draw much larger packs of stronger mobs to you. Please note that the "important" mobs I'm listing are restricted to the area I'll be covering for the three bosses in question. (Also of note are the big Berserkers; they do hit hard and have an AoE fear, threat wipe and knockback, but are fairly easy to take down). Oh, and if you're after a Razzashi Hatchling, the red raptors in here do rarely drop it.
1. The Entrance: I run in, dismiss pet, and then mount up. You can run along the left-hand side of the grass here, right along the water's edge, and make your way straight across the first bridge, and then the second.
2. Mandokir's Room: Bloodlord Mandokir is a hard solo fight with several quirks. You may wish to clear his room (carefully, pack by pack and with your back to the wall for humanoid groups) if you're unfamiliar with the fight or wish to play it safe. The Bloodlord has a nasty fear, among other things, that can easily send you careening into multiple mob packs if you aren't careful on positioning, or are unlucky. If you go the route of clearing the room, also kill the Gurubashi Berserker that periodically patrols in, and through, the area. It walks nearly to the bottom of Mandokir's ramp and can quickly complicate a bad situation.
3. Mandokir: See the ramp, with the Vilebranch Speaker at the bottom? Once you kill him, the Bloodlord aggroes.

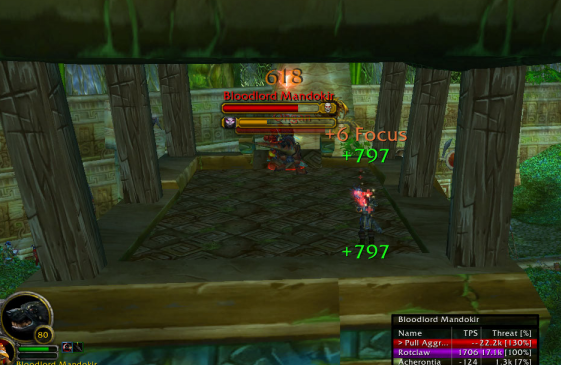
The boss will periodically cast Fear, wipe his threat, and often Whirlwind. These things are all dangerous; use PvP trinket or BW to break the fears if it looks like you may hit mobs, or run into his WW at low health. When he wipes threat, Feign Death or MD the pet again. Stay away from melee range or his WW will hurt! His raptor will also attack--this isn't tameable, so don't spend time Beast Loring it.
4. Surviving Mandokir: If you need to bandage, wait until his charge, and if possible his fear, have just been used, to reduce the likelihood of either interrupting your bandage cast. Make sure Mend Pet is always ticking. If you're going to die, go feign death in a corner somewhere; sometimes your pet will solo him, other times it will die and you can revive pet. Sometimes, even with the best preparation, you'll get unlucky as far as charge, WW, fear and threat dump, and you will die. This doesn't mean it's impossible by any means; you just got unlucky, it happens. Sometimes you will finish at full hp; sometimes you will die. Due to this RNG, I consider Mandokir one of the harder bosses to solo. You CAN avoid some of the stuns by not taking -any- action during the frequent debuff "Threatening Gaze," but he seems to charge anyway sometimes, and you'll have the debuff more often than not anyway. I prefer to simply nuke through it, but if you are having trouble, try holding off during the debuff.
Be aware that you cannot eat while in his room once he's been aggroed once; for some reason you are forced to stand every few seconds, interrupting food consumption. Do NOT waste buff food in this way!
In Summary: Stay near the top of the stairs, keep LoS on your pet & Mend ticking, stay out of melee range, and nuke as much as possible.
Last edited by Acherontia on Mon Oct 25, 2010 12:08 am, edited 3 times in total.
-
Acherontia
- Community Resource
- Posts: 3072
- Joined: Mon Jan 25, 2010 12:27 pm
- Realm: Argent Dawn EU
- Gender: Female
Re: Acherontia's Solo Mount-Running Guide for Hunters
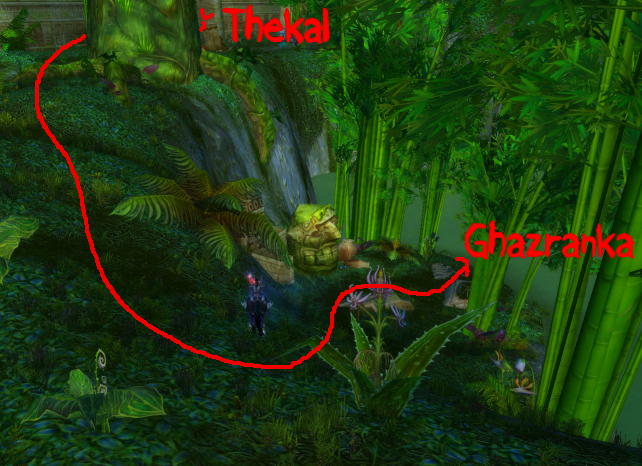
5. To Thekal: Dismiss pet and mount up. Head back out of Mandokir's room, going the way you came (down his tower's ramp, to the right, curving around to the right until you get to the steep ramp). Hang right, passing the various Adders (sticking to the left side of this trail, you can pass all the trash without aggroing). You'll pass the entrance to the Edge of Madness on your right, a path down to the water on your left, and a couple Berserkers in the road that you can bypass. Around the next corner, on the right you should see a large group of tigers. Watch carefully to ensure that the frolicking Tiger Cubs don't run into you--they race across the path back and forth, and may aggro all of the nearby mobs onto you.
6. Thekal's Room: More Tiger Cubs race to and fro here. Pick them off if you're going to clear trash; otherwise, dodge them and run straight ahead to the next big stone "doorway," and stop just inside. If you want to clear trash, the safe route is to dismount, call pet, MD the pet, and then open with a Freezing Trap one one of the Axe-Throwers. Nuke the other two down, then kill the trapped one, then the tigers. This trash dies easily, but the Throwers can present trouble by stunning you and your pet. When you're ready to fight the boss, position yourself inside his smaller area, just outside the building. Keep your back not toward the open area (the final form of Thekal has a knockback), but toward either side (North or South). Note: I'm giving the -real- tactics of actually fighting Thekal. There are ways to bug it, but this isn't covered here, as it's completely different and requires twice the space. I also prefer not to do it, because doing it as intended is just as fast if not faster, and the "bug" version often bugs for me anyway, screwing things up and making it take even longer.
Sidenote: if Thekal has any MS effects upon him when he first dies, his Tiger form will res with that much less HP (50% MS = 50% hp, 25% MS = 75% hp, etc).
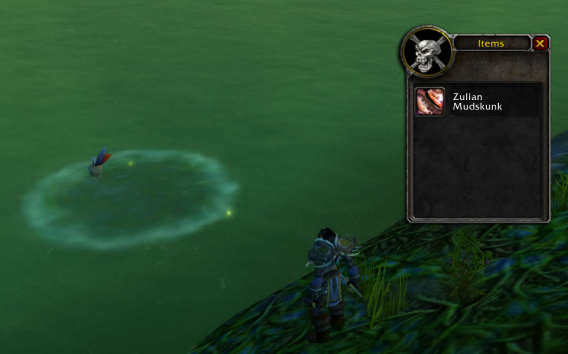
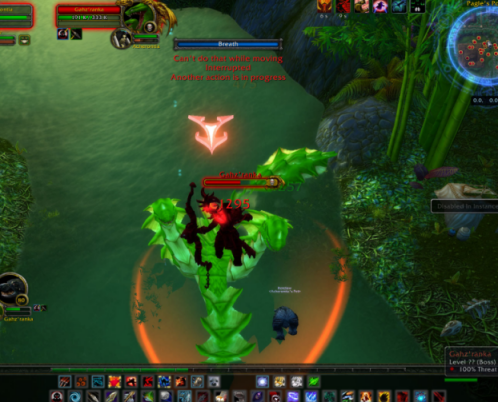
8. To Ghaz'ranka: If you're a fisherman and have done the quest to buy Mudskunk Lures from Nat Pagle (or perhaps if you buy them off AH; they aren't bound, but I can't find information on whether you can summon without having done the quest), you can summon this extra boss. You'll need to bring the lure with you. Killing it gives a chance to loot a coveted Tome of Polymorph: Turtle, which can sell for hundreds or even thousands of gold. It's a quick and easy side boss that I suggest doing when you do your mount run. First, you'll need to run down to the water and fish up five Zulian Mudskunks from the "Muddy Churning Waters" pool.
6. Thekal's Room: More Tiger Cubs race to and fro here. Pick them off if you're going to clear trash; otherwise, dodge them and run straight ahead to the next big stone "doorway," and stop just inside. If you want to clear trash, the safe route is to dismount, call pet, MD the pet, and then open with a Freezing Trap one one of the Axe-Throwers. Nuke the other two down, then kill the trapped one, then the tigers. This trash dies easily, but the Throwers can present trouble by stunning you and your pet. When you're ready to fight the boss, position yourself inside his smaller area, just outside the building. Keep your back not toward the open area (the final form of Thekal has a knockback), but toward either side (North or South). Note: I'm giving the -real- tactics of actually fighting Thekal. There are ways to bug it, but this isn't covered here, as it's completely different and requires twice the space. I also prefer not to do it, because doing it as intended is just as fast if not faster, and the "bug" version often bugs for me anyway, screwing things up and making it take even longer.
Sidenote: if Thekal has any MS effects upon him when he first dies, his Tiger form will res with that much less HP (50% MS = 50% hp, 25% MS = 75% hp, etc).
8. To Ghaz'ranka: If you're a fisherman and have done the quest to buy Mudskunk Lures from Nat Pagle (or perhaps if you buy them off AH; they aren't bound, but I can't find information on whether you can summon without having done the quest), you can summon this extra boss. You'll need to bring the lure with you. Killing it gives a chance to loot a coveted Tome of Polymorph: Turtle, which can sell for hundreds or even thousands of gold. It's a quick and easy side boss that I suggest doing when you do your mount run. First, you'll need to run down to the water and fish up five Zulian Mudskunks from the "Muddy Churning Waters" pool.
Last edited by Acherontia on Tue Oct 19, 2010 10:53 pm, edited 2 times in total.
-
Acherontia
- Community Resource
- Posts: 3072
- Joined: Mon Jan 25, 2010 12:27 pm
- Realm: Argent Dawn EU
- Gender: Female
Re: Acherontia's Solo Mount-Running Guide for Hunters
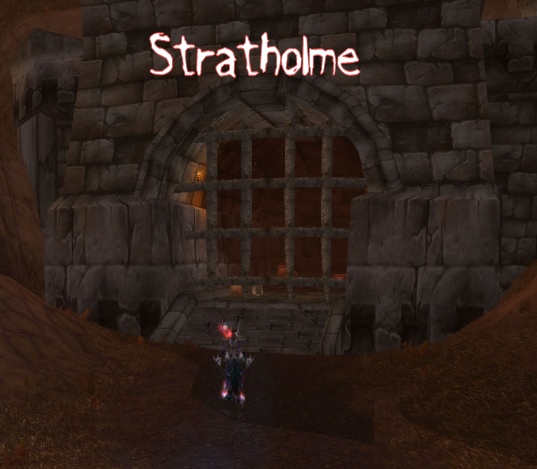
Part 3: Stratholme
Rivendare's Deathcharger
This guide isn't so much a Hunter Solo guide as a "quick Strat run" guide. This dungeon isn't challenging for level 80 or even many 70 players, but it's useful to have a path laid out for the newcomer regardless. You can leave your pet away and use Aspect of the Pack for most of this.
Instance Notes: This level 60 dungeon can be found in the Eastern Plaguelands, at the far north. In order to follow the quick farming guide I'm going to lay out, you'll need the Key to the City. This drops off of Magistrate Barthilas, who can be found just inside the Undead side when you clear the Living side for the first time. Once you have the key, you can then enter Strat via the back gate, called the Eastwall Gate, nestled in the hillside far to the east of Stratholme's main entrance.
Mob Notes: The Strat run can easily be done in less than ten minutes, and nearly all of the trash skipped. Therefore, this guide will be very brief. However, there are three mobs to take note of: the Gargoyles can fear you; the Banshees can silence you (iirc; might have been the fiends) and the Crypt Fiends can root you. Regardless, the Gargoyles patrol fast and thick, so be careful where you tread, and be ready to cancel Pack and feign out of harm's way.
1. The Back Gate: Come on in. Dismiss your pet and hit Aspect of the Pack/Cheetah. Use your key on the first gate, and head around this room to the left. Yes, you can catch and kill the Magistrate here if you try hard enough, but there's no point, and it'll aggro the mobs. Head across the room, open the next gate; go through the hall, turn right (there's no choice here) and open the third gate. Stick to your left, now, and avoiding all mobs, head to the big glowing Ziggurat before you. There is a Crypt Fiend boss here; call pet, kill it, head into the Ziggurat, and kill all of the acolytes. Sometimes you'll miss one--be sure to watch for the red text shouting "A Ziggurat has fallen!" or something to that effect, and if you play with sound, listen for the whistling-wind sound of the magic channeling to cease. If you do miss one, you have to come all the way back, so don't!
2. Banshee and Malekei: Dismiss pet. Make your way back to the right, then head around to the left where the road splits. You'll see another ziggurat past some mobs; skip past them, get onto the boss's platform--it's a banshee, and if you take too long, she'll Mind-Control you and kill your pet. Call pet, nuke, clear Ziggurat, dismiss pet. Again, be sure all acolytes are cleared! Then go out, heading right, and make your way along this narrow hallway until you see another ziggurat on the right. This third and last one features as a boss a human mage named Malekei the Pallid or something similar--you can climb up the railing on the right side of the stairs and skip the trash, or quickly AoE it down. Once you clear this last ziggurat, you'll see a yell to the effect of "The last of the crystals has fallen! The Slaughterhouse is vulnerable!" This is your cue. Dismiss pet and run to the right. Be aware that this is where you'll probably need your one Feign Death, as many mobs patrol closely together here. Try and get a bit down the hall past them before you do feign. You'll see a massive open gate ahead; get inside. If you have lowbies or friends with you, be sure they accompany you beneath the gate; this closes behind you, locking other players out, once you engage the enemies beyond.
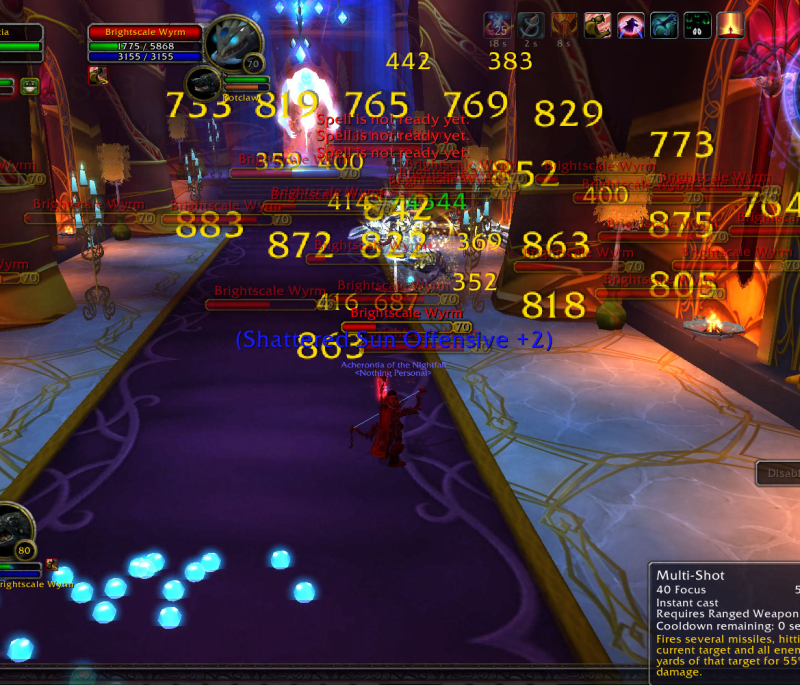
3. The Slaughterhouse: This is a large, open courtyard with a ziggurat at the center and many Abominations wandering about. Once inside, call pet, switch Aspect to Hawk and kill the Abominations. You can send pet to each in turn and then MD + AoE them down, or you can two- and three-shot each of them. One type spits AoE poison; the other launches small oozes, often four or five. One Multishot kills the lot. Once these are all dead, Baron Rivendare will yell for Ramstein the Gorger to come out. You can kill this ugly brute in a few seconds, but if you're lower level or badly geared, he does do a stun on the "tank" (pet) and will charge you instead, so be ready. Once he's dead, a swarm of low-health skeletons will charge from the small locked door to the left side of the large room. (This tunnel has a portal at the end, by the way, but it's unusable--ignore it.) A trap or a couple multishots combined with MD will easily destroy these.
Rivendare's Deathcharger
This guide isn't so much a Hunter Solo guide as a "quick Strat run" guide. This dungeon isn't challenging for level 80 or even many 70 players, but it's useful to have a path laid out for the newcomer regardless. You can leave your pet away and use Aspect of the Pack for most of this.
Instance Notes: This level 60 dungeon can be found in the Eastern Plaguelands, at the far north. In order to follow the quick farming guide I'm going to lay out, you'll need the Key to the City. This drops off of Magistrate Barthilas, who can be found just inside the Undead side when you clear the Living side for the first time. Once you have the key, you can then enter Strat via the back gate, called the Eastwall Gate, nestled in the hillside far to the east of Stratholme's main entrance.
Mob Notes: The Strat run can easily be done in less than ten minutes, and nearly all of the trash skipped. Therefore, this guide will be very brief. However, there are three mobs to take note of: the Gargoyles can fear you; the Banshees can silence you (iirc; might have been the fiends) and the Crypt Fiends can root you. Regardless, the Gargoyles patrol fast and thick, so be careful where you tread, and be ready to cancel Pack and feign out of harm's way.
1. The Back Gate: Come on in. Dismiss your pet and hit Aspect of the Pack/Cheetah. Use your key on the first gate, and head around this room to the left. Yes, you can catch and kill the Magistrate here if you try hard enough, but there's no point, and it'll aggro the mobs. Head across the room, open the next gate; go through the hall, turn right (there's no choice here) and open the third gate. Stick to your left, now, and avoiding all mobs, head to the big glowing Ziggurat before you. There is a Crypt Fiend boss here; call pet, kill it, head into the Ziggurat, and kill all of the acolytes. Sometimes you'll miss one--be sure to watch for the red text shouting "A Ziggurat has fallen!" or something to that effect, and if you play with sound, listen for the whistling-wind sound of the magic channeling to cease. If you do miss one, you have to come all the way back, so don't!
2. Banshee and Malekei: Dismiss pet. Make your way back to the right, then head around to the left where the road splits. You'll see another ziggurat past some mobs; skip past them, get onto the boss's platform--it's a banshee, and if you take too long, she'll Mind-Control you and kill your pet. Call pet, nuke, clear Ziggurat, dismiss pet. Again, be sure all acolytes are cleared! Then go out, heading right, and make your way along this narrow hallway until you see another ziggurat on the right. This third and last one features as a boss a human mage named Malekei the Pallid or something similar--you can climb up the railing on the right side of the stairs and skip the trash, or quickly AoE it down. Once you clear this last ziggurat, you'll see a yell to the effect of "The last of the crystals has fallen! The Slaughterhouse is vulnerable!" This is your cue. Dismiss pet and run to the right. Be aware that this is where you'll probably need your one Feign Death, as many mobs patrol closely together here. Try and get a bit down the hall past them before you do feign. You'll see a massive open gate ahead; get inside. If you have lowbies or friends with you, be sure they accompany you beneath the gate; this closes behind you, locking other players out, once you engage the enemies beyond.
3. The Slaughterhouse: This is a large, open courtyard with a ziggurat at the center and many Abominations wandering about. Once inside, call pet, switch Aspect to Hawk and kill the Abominations. You can send pet to each in turn and then MD + AoE them down, or you can two- and three-shot each of them. One type spits AoE poison; the other launches small oozes, often four or five. One Multishot kills the lot. Once these are all dead, Baron Rivendare will yell for Ramstein the Gorger to come out. You can kill this ugly brute in a few seconds, but if you're lower level or badly geared, he does do a stun on the "tank" (pet) and will charge you instead, so be ready. Once he's dead, a swarm of low-health skeletons will charge from the small locked door to the left side of the large room. (This tunnel has a portal at the end, by the way, but it's unusable--ignore it.) A trap or a couple multishots combined with MD will easily destroy these.


Last edited by Acherontia on Tue Oct 19, 2010 11:01 pm, edited 4 times in total.
-
Acherontia
- Community Resource
- Posts: 3072
- Joined: Mon Jan 25, 2010 12:27 pm
- Realm: Argent Dawn EU
- Gender: Female
Re: Acherontia's Solo Mount-Running Guide for Hunters
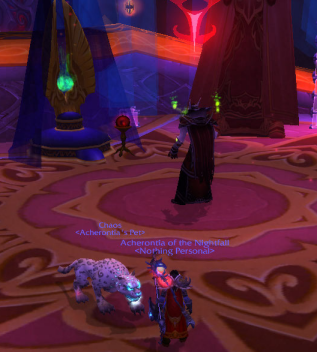
(Images To Come)
Part 4: Karazhan
Midnight's Reins
This brief guide is only for the first boss--Attumen the Huntsman and his steed Midnight--and really doesn't require a map.
Instance Notes: You will need the ability to open the gate. Rogues can lockpick, blacksmiths can use skeleton keys, and Engineers may be able to blow the lock. However, you can run the quest chain for the key yourself if you have no other options. In addition, some models of player character can go behind Karazhan, leaping up on some rocks and pressing against the rear of the tower, and fall through to underneath--then run to the instance portal from behind. Other models can't fit through the gap. This level 70 dungeon is actually a raid, and thus once again you'l require a raid group to enter. Again, be certain that you don't invite some seemingly friendly stranger who might turn up and roll on your mount.
Mob Notes: The undead horses can fear you; the Stablemasters can heal the horses or themselves.
1. Trash. First and foremost, know that this is a fairly difficult fight; although it is straightforward, during Phase One the boss hits quite hard and can down an undergeared hunter's tank pet--or a mismanaged or badly-specced pet. There IS a trick to ensuring the pet doesn't take too much damage, but we'll cover that ahead; the point is, bring a good tank pet! Once you come into Karazhan, open the wooden door and just curve around to the left. You'll see some undead skeletal horses here. Begin pulling them and carefully killing each group; use MD and pull back a bit to avoid nasty fear-induced situations, focusing down any Stablemasters first. Be aware that the larger (4+ mob) packs should be cc'd to some extent, and that your pet may die--if this happens, run away a bit and feign death. The trash respawns in about a half hour, so clear quickish and be ready to re-clear should you take too long.
2. Attumen. Once the trash is cleared up to the yellow-named horse, Midnight, you can stop a moment and breathe. Heal your pet up, wait on any cooldowns, and then send pet. DO NOT use Misdirection yet! Once your pet is nicely settled in, begin working Midnight's HP down. Once Midnight is at 95%, Attuman will come running--THIS is when you use your Misdirection. Make sure to lay into him until the MD is up; he isn't tauntable, and so if he comes for you first, things get messy. Add to that the fact that if you feign death before your pet is on his threat table, he will sometimes reset entirely--vanishing completely, unable to be killed for loot until the instance soft-resets (30 minutes with nobody inside--or possibly manually reset if other bosses are alive). Attuman in this phase hits very hard.
The trick is to make absolutely certain that neither he nor Midnight ever gets to the side of, or behind, your pet. Move your pet, recalling and resending it or manually using "go to" with the pet on passive, and position it so that both bosses are in front. Keep Mend up, and nuke hard, but watch your threat. Stay fairly close to the boss; he has a nasty Charge if you get far away. Also watch the curse he places--it increases your chance to miss by 50%, so if the pet gets it for very long, your threat may be an issue. Be ready to feign in that case--or if the pet is going to die. Attumen takes gear and a bit of practice, but in the end he's perfectly viable for any hunter to solo. Once Attumen (or Midnight, whichever you choose to dps) hits 25% hp, he will mount on her and fight you as one boss. At this point he is significantly easier, dealing much less damage; you can relax now. Good luck!
(Images for Kara to come!)
-
Anyia

- Community Resource
- Posts: 1135
- Joined: Mon Aug 23, 2010 9:35 pm
- Realm: Jubei'Thos (US/Oceania)
- Location: Australia
- Contact:
Re: Acherontia's Solo Mount-Running Guide for Hunters
Nice guides! Will have to head back in to Karazhan I think!
-
cowmuflage

- Petopia Artist
- Posts: 11998
- Joined: Thu Mar 11, 2010 10:00 pm
- Realm: dath remar
- Gender: female
- Location: New zealand, auckland
Re: Acherontia's Solo Mount-Running Guide for Hunters
You forgot AQ40 lol. Oh i know its not soloing but i do these with my GM whos a pally and it makes things easyer. Well around the raptor boss with that sickness you get? yeah pallys make that easy.
I am a professional 2D animator :3
Heres my DA page
My wow model sheets (NSFW) that anyone can use!
First 251 Pokemon in Adventure time style! By me XD
Cow's art thread!
Heres my DA page
My wow model sheets (NSFW) that anyone can use!
First 251 Pokemon in Adventure time style! By me XD
Cow's art thread!
-
Acherontia
- Community Resource
- Posts: 3072
- Joined: Mon Jan 25, 2010 12:27 pm
- Realm: Argent Dawn EU
- Gender: Female
Re: Acherontia's Solo Mount-Running Guide for Hunters
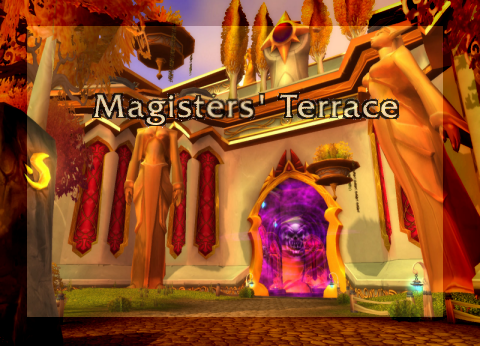
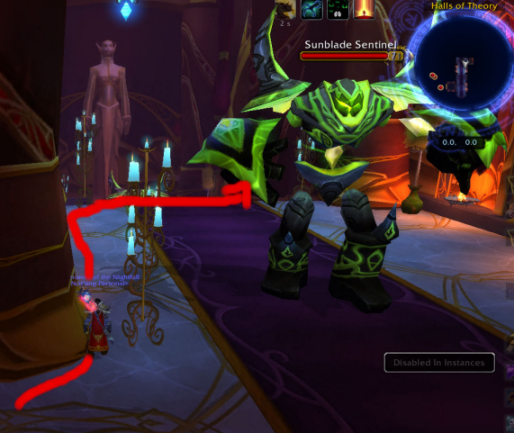
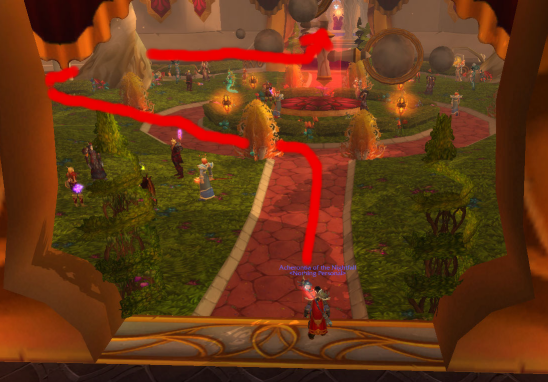
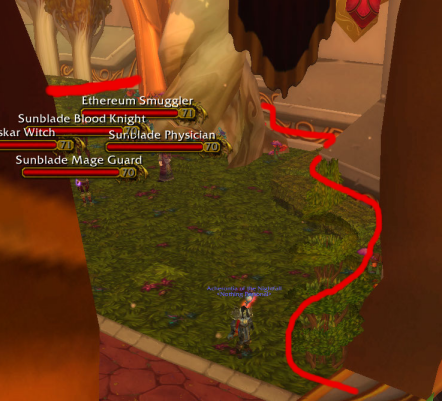
Part 5: Magister's Terrace
Swift White Hawkstrider
Mob Notes: Nothing, really. When you first enter, you may wish to check on the group makeup of Princess Delrissa's event, and reset if it's too much for you; otherwise, nuking healers in each group if you're having trouble is all that is necessary for trash.
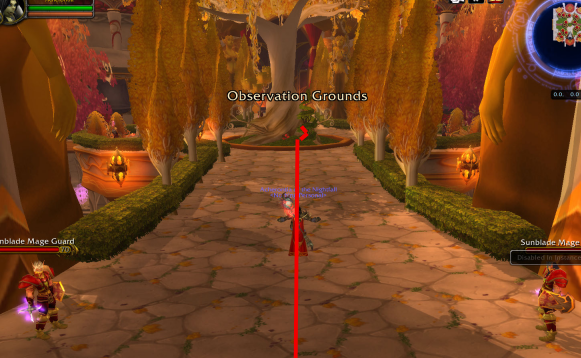
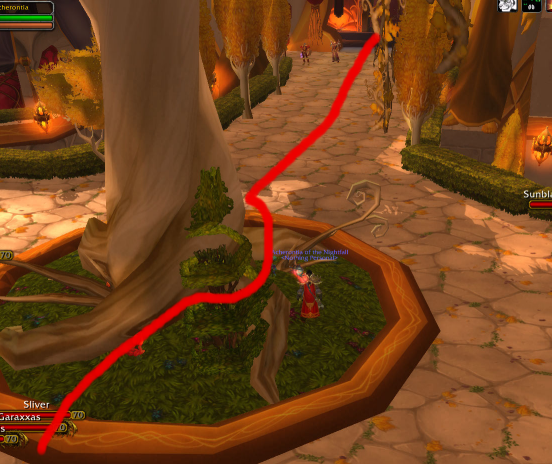
1. First Hallway. Dismiss your pet. Put on Aspect of the Pack. You'll be looking down a long hallway with a tree in the center; before you, two guards line the path, with a pull on either side halfway down, a patrol, and a pack at the end.
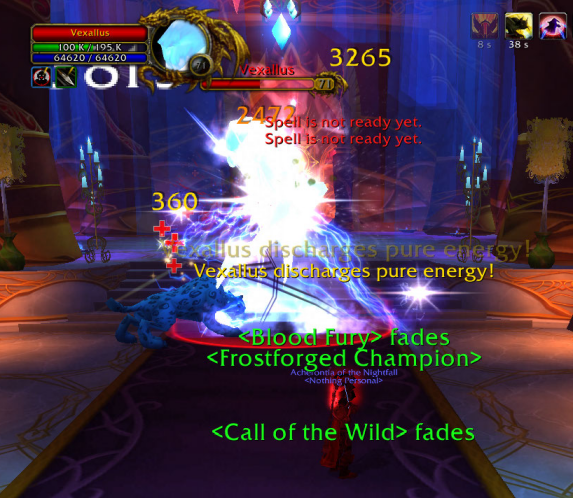
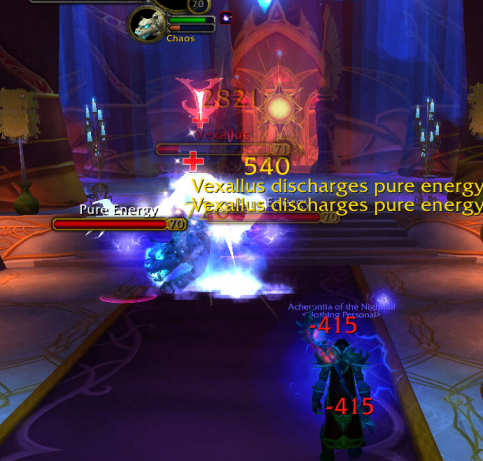
4. Vexallus. As someone notes in this thread, this is smoothly done with a Ferocity pet. The boss sends out low-hp energy orbs that, when killed, both apply a DoT and a +damage buff. You can simply mend pet, send your pet onto a handful of these, and then nuke the boss--or do it yourself.
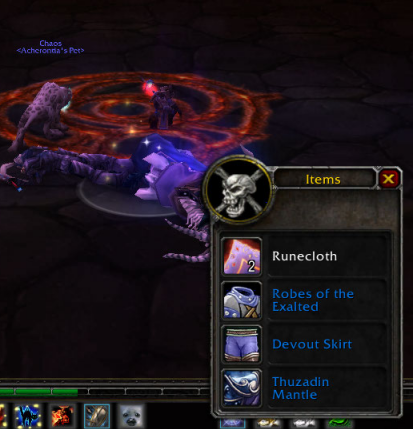
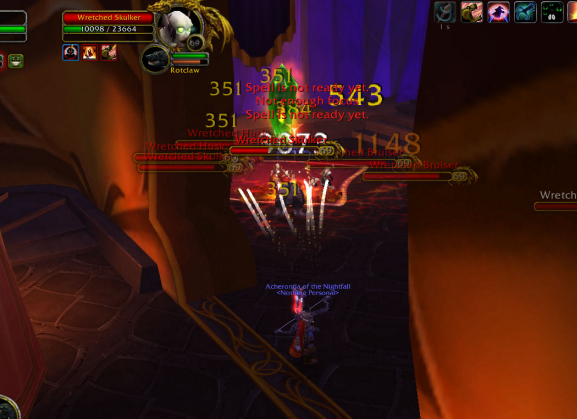
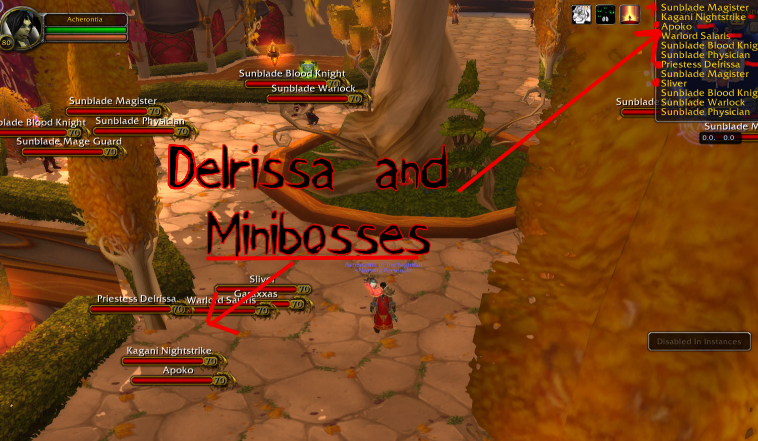
6. Princess Delrissa. This is a PvP-style encounter, with several minibosses who do not obey ANY threat rules and who use both crowd-control and heals to attempt to kill you. At level 80, this is easily the hardest boss--depending on Delrissa's group makeup, which changes randomly each run. I use a Spirit Beast for the heals, with a macro to heal me when I'm getting low; attempting to "tank" this is useless since, as mentioned, the bosses don't obey threat/aggro rules. You may wish to clear the surrounding trash for room to maneuver; an accidental pull of a group generally spells death. If you're very careful and wearing a PvP trinket, however, chances are you'll be okay. The Princess is a Shivarra Priestess, and casts PW: Shield and Renew. Purge this with Tranquilizing Shot if you're having trouble downing her. She comes with several random minibosses, and to complete this fight, you must kill them all. You will likely find Deterrance, Disengage and Feign Death useful here, as in real PvP.
I use a Spirit Beast for this fight as well. The extra damage is useful, the healing for the Gravity Lapse phase is nice, but really he just doesn't need a tank pet. You will want to MD and Mend, send pet and begin nuking as hard as you can; if you take too long getting him to phase 2, he will cast a Pyroblast that may kill your pet. Having Heart of the Phoenix or Cower at the ready (i.e. off autocast) if your damage is particularly low may be wise. If and when Kael'thas spawns Phoenixes, you may choose to nuke them down or simply run away; their Hellfire-like move eventually kills them anyway.
Once Kael'thas is at 50% hp, he changes to a Gravity Lapse phase. For this portion, your pet will be on the ground eating his face; keep Mend Pet up. Your job is to swim around in the air avoiding the big purple arcane balls, and to take potshots at Kael when you have time. Save Fervor for this if you can; you'll find that the gravity resets now and then, interrupting some of your Steady Shot casts. Try to stay low to the ground toward the end, or the fall damage may hurt. When Kael dies, this phase ends; if he doesn't die before the end, he will go into Phase 3 and you'll have a few seconds to nuke him before he goes back to Phase 2. You should kill him in Phase 3, however, as he becomes weakened after channeling Gravity Lapse and takes 50% more damage.
Swift White Hawkstrider
Mob Notes: Nothing, really. When you first enter, you may wish to check on the group makeup of Princess Delrissa's event, and reset if it's too much for you; otherwise, nuking healers in each group if you're having trouble is all that is necessary for trash.
1. First Hallway. Dismiss your pet. Put on Aspect of the Pack. You'll be looking down a long hallway with a tree in the center; before you, two guards line the path, with a pull on either side halfway down, a patrol, and a pack at the end.
4. Vexallus. As someone notes in this thread, this is smoothly done with a Ferocity pet. The boss sends out low-hp energy orbs that, when killed, both apply a DoT and a +damage buff. You can simply mend pet, send your pet onto a handful of these, and then nuke the boss--or do it yourself.
6. Princess Delrissa. This is a PvP-style encounter, with several minibosses who do not obey ANY threat rules and who use both crowd-control and heals to attempt to kill you. At level 80, this is easily the hardest boss--depending on Delrissa's group makeup, which changes randomly each run. I use a Spirit Beast for the heals, with a macro to heal me when I'm getting low; attempting to "tank" this is useless since, as mentioned, the bosses don't obey threat/aggro rules. You may wish to clear the surrounding trash for room to maneuver; an accidental pull of a group generally spells death. If you're very careful and wearing a PvP trinket, however, chances are you'll be okay. The Princess is a Shivarra Priestess, and casts PW: Shield and Renew. Purge this with Tranquilizing Shot if you're having trouble downing her. She comes with several random minibosses, and to complete this fight, you must kill them all. You will likely find Deterrance, Disengage and Feign Death useful here, as in real PvP.
I use a Spirit Beast for this fight as well. The extra damage is useful, the healing for the Gravity Lapse phase is nice, but really he just doesn't need a tank pet. You will want to MD and Mend, send pet and begin nuking as hard as you can; if you take too long getting him to phase 2, he will cast a Pyroblast that may kill your pet. Having Heart of the Phoenix or Cower at the ready (i.e. off autocast) if your damage is particularly low may be wise. If and when Kael'thas spawns Phoenixes, you may choose to nuke them down or simply run away; their Hellfire-like move eventually kills them anyway.
Once Kael'thas is at 50% hp, he changes to a Gravity Lapse phase. For this portion, your pet will be on the ground eating his face; keep Mend Pet up. Your job is to swim around in the air avoiding the big purple arcane balls, and to take potshots at Kael when you have time. Save Fervor for this if you can; you'll find that the gravity resets now and then, interrupting some of your Steady Shot casts. Try to stay low to the ground toward the end, or the fall damage may hurt. When Kael dies, this phase ends; if he doesn't die before the end, he will go into Phase 3 and you'll have a few seconds to nuke him before he goes back to Phase 2. You should kill him in Phase 3, however, as he becomes weakened after channeling Gravity Lapse and takes 50% more damage.
Last edited by Acherontia on Mon Oct 25, 2010 6:09 am, edited 1 time in total.
-
Magnakilro

- Illustrious Master Hunter

- Posts: 10512
- Joined: Tue Jan 26, 2010 5:12 pm
- Realm: Eonar
- Gender: Male Irl. Male orc
- Location: No longer in your pants
Re: Acherontia's Solo Mount-Running Guide for Hunters
You only need to kill the mobs before the first boss...tho the ones after have better drop rates.
Avatar made by the awesome Senna-umbreon
-
Acherontia
- Community Resource
- Posts: 3072
- Joined: Mon Jan 25, 2010 12:27 pm
- Realm: Argent Dawn EU
- Gender: Female
Re: Acherontia's Solo Mount-Running Guide for Hunters
No guide is required for those few, though 
-
Shadowkaizen

- Apprentice Hunter

- Posts: 99
- Joined: Wed Feb 24, 2010 9:10 pm
- Realm: Earthen Ring
- Location: Hunting in the moonlight...
Re: Acherontia's Solo Mount-Running Guide for Hunters
This is a great guide. I have been hearing a lot of petopians say they are having a hard time soloing stuff and I just want to log into thier realm and help them. I have been soloing these for a long time now and I was actually starting to think about writing a guide of my own until I seen this. This is a lot better than what I had in mind and I applaud you for your work.
Remeber my fellow Petopians...we are hunter...and there isn't much we can't do!
Remeber my fellow Petopians...we are hunter...and there isn't much we can't do!
The shadows are my ally...and so is that large wolf behind you.

Re: Acherontia's Solo Mount-Running Guide for Hunters
Thanks for sharing the info.
-
Mustafah

- Expert Hunter

- Posts: 379
- Joined: Wed Jan 06, 2010 10:08 am
- Realm: Draenor EU
- Gender: Male
- Location: Uldum, riding a camel like a maniac =o
Re: Acherontia's Solo Mount-Running Guide for Hunters
Nice guide. will try when I am lvl80. Thanks for sharing it.
Lots of thanks for TygerDarkstorm for the awesome sig!! =D
Mustafah wrote:Playable Pandaren with racial camel mount!!!
-
Rhyela

- Illustrious Master Hunter
- Posts: 6857
- Joined: Wed Feb 10, 2010 12:13 pm
- Realm: US - Ysera
- Gender: Female playing males and females
- Location: My chair
Re: Acherontia's Solo Mount-Running Guide for Hunters
Awesome job, thank you! I used the guide to solo the ZG mount bosses tonight and while things didn't go quite as smoothly for me as laid out here (my own fault), I did manage to pull it off. Quite a rush for a first-time soloer. Neither mount dropped sadly, but at least I know I can be back at it next reset!
Thank you times a million!
Thank you times a million!

Signature and avatar created by Serenith!
Slickrock wrote:Given their current trend, we'll probably get a spirit toucan that farts loops.
-
cowmuflage
- Petopia Artist
- Posts: 11998
- Joined: Thu Mar 11, 2010 10:00 pm
- Realm: dath remar
- Gender: female
- Location: New zealand, auckland
Re: Acherontia's Solo Mount-Running Guide for Hunters
Well Acherontia all you really needed to say was to kill the blue guys ONLY. Its pointless to go after the dogs as your more likely to get your pet killed. Anyway its an easy 4 mounts to add to your mount collection and heck of alot easyer to get than the other drops!
I am a professional 2D animator :3
Heres my DA page
My wow model sheets (NSFW) that anyone can use!
First 251 Pokemon in Adventure time style! By me XD
Cow's art thread!
Heres my DA page
My wow model sheets (NSFW) that anyone can use!
First 251 Pokemon in Adventure time style! By me XD
Cow's art thread!
-
SpiritBinder

- Mount Master
- Posts: 3260
- Joined: Tue Jan 05, 2010 11:45 pm
- Realm: Aman'Thul
- Location: Australia
Re: Acherontia's Solo Mount-Running Guide for Hunters
Very nicely done 
The pictures are a real treat as sometimes text, no matter how much explaining, still cant not really explain what a picture can. I do very similar runs myself but no longer have to do Kara or the raptor boss as the RNG gods have blessed me on those ones. It might be worth adding the white hawk strider later on too.
At the moment running it of heroic can be rather difficult if your not a seasoned extreme solo'er, but when cata comes out and lvls go up, it think it will be very doable, maybe even U.P. for the blue proto? ... I'm getting excited
Great guides once again
◄ ─ T A N N O N ─ T H E ─ S P I R I T B I N D E R ─ ►
-
cowmuflage
- Petopia Artist
- Posts: 11998
- Joined: Thu Mar 11, 2010 10:00 pm
- Realm: dath remar
- Gender: female
- Location: New zealand, auckland
Re: Acherontia's Solo Mount-Running Guide for Hunters
UP might be a bit a bit of a strech really. lol don't get your hopes up.
I am a professional 2D animator :3
Heres my DA page
My wow model sheets (NSFW) that anyone can use!
First 251 Pokemon in Adventure time style! By me XD
Cow's art thread!
Heres my DA page
My wow model sheets (NSFW) that anyone can use!
First 251 Pokemon in Adventure time style! By me XD
Cow's art thread!
-
Acherontia
- Community Resource
- Posts: 3072
- Joined: Mon Jan 25, 2010 12:27 pm
- Realm: Argent Dawn EU
- Gender: Female
Re: Acherontia's Solo Mount-Running Guide for Hunters
I'd heard rumors that UP was already being solo'd. By hunters? Dunno. >.< You can skip the first two bosses though can't you? And the protodrake boss is just a matter of gear really.
I SHOULD add the Magister's Terrace one, eh!? I utterly forgot about him; and to think I just started farming him the other day I'll do that one once it's routine; may have learned some tricks by then
I SHOULD add the Magister's Terrace one, eh!? I utterly forgot about him; and to think I just started farming him the other day
-
cowmuflage
- Petopia Artist
- Posts: 11998
- Joined: Thu Mar 11, 2010 10:00 pm
- Realm: dath remar
- Gender: female
- Location: New zealand, auckland
Re: Acherontia's Solo Mount-Running Guide for Hunters
yes you should put that up
I am a professional 2D animator :3
Heres my DA page
My wow model sheets (NSFW) that anyone can use!
First 251 Pokemon in Adventure time style! By me XD
Cow's art thread!
Heres my DA page
My wow model sheets (NSFW) that anyone can use!
First 251 Pokemon in Adventure time style! By me XD
Cow's art thread!